Stop-Action Hummingbird Photography
Much of what I know about photography comes from stop-action hummingbird photography. I have summarized my experiences here. I am not looking to market, or sell, or otherwise gain any notoriety. I simply want to share what I have learned. Please be respectful, all text and images are copyrighted material and may not be reproduced without my approval.
My Journey began at the advent of the digital era. Many hours were spent walking the gardens with a long lens on a monopod. Early on, like everyone, I tried to see how close I might get to the birds. I learned about hummingbird behavior, and where to go to see them.
I realized that even when perched these birds seem to be in constant movement. Shutter speed and depth of field always seemed to be at odds. On-camera flash helped in that it provided, in a practical sense, a surplus of light because there was enough light to shoot at high f#’s as long as I could get close. But backgrounds and composition became unnatural. I needed more control of the situation.
Ultimately I achieved a solution which enabled complete control of the light. For me, the epiphany was understanding that multiple flashes of short duration were the best method for achieving this. I identified and evaluated commercial photography equipment that were suited to this purpose. Ultimately creating a portable, self-contained rig that could be easily transported to the field.
Contents:
- Does Flash Harm?
- COVID Swarm
- Early Inspiration
- American Southwest
- Freezing Flight
- Flash Details
- Flash Duration
- Practical Considerations
- Putting it in Practice
- Main Light
- Background
- Back Light
- Alternatives
- Perspective
- Image Quality
- Autofocus
- Where to shoot - Where to stay
- Bay Area Flora ID
- Turf Battles
First, I want to say that I have tried very hard not to harm or disturb any birds in the course of my photography. Many of the techniques I describe utilize one or more flashes. It has been very difficult to find any objective information as to how the flashes may harm the birds. A literature search will not really find anything specific to hummingbirds.
In the course of photography, the humane photographer should be aware that birds are commonly stressed in many ways. Who is to say whether a flash is any more or less stressful than invading a bird’s space or otherwise controlling their behavior for the purpose of a photograph.
To be on the safe side, I now have moved away from controlling, or interfering with (including flash) birds for the purpose of a photo.
Spring through Fall of 2020 and 2021 witnessed an unusual and unprecedented hummingbird swarm in the Bay Area, or at least in my yard. Numbers rivaled that of what I have seen in some of the Arizona hot spots. On my array of perhaps six feeders I routinely witnessed 20 birds present at a time. I found the nectar consumption numbers hard to believe and can only speculate that the birds were overeating! One of the several feeders is 32 oz. It was consumed over the course of a single day. One common estimate is that the daily carbohydrate needs of one bird amounts to 1-2 oz of 4:1 sugar water. So that single feeder (one of several) would be sustaining more than 16 birds.
A time-lapse video for one day:

Figure – Typical number of birds present at feeders, midday:

Being holed up during the COVID peak, my project was to use my short duration flash setup to capture the behavior of this swarm. Being primarily a portrait photographer; my hummingbird photo style is that of a studio portrait: stop action of birds interacting with each other and feeding and the indigenous flora. Main, fill, and back lighting is used to create the “portraits.”
Please note that other than cropping and resizing for the web, all photos I exhibit are right out of the camera. These are photos of real birds feeding on real flowers. Backgrounds are not ‘photoshopped,” levels are not adjusted, there is no sharpening or other processing other than what comes out of the camera.
Here is a link to the Swarm Photos.
One of my early inspirations for hummingbird photography was the book: Hummingbirds, Their Life and Behavior, by Robert and Esther Tyrrell. This volume is the ultimate coffee table book of hummingbird photos. Done with film photography in the 1970’s and 1980’s, the Tyrrells had access to the latest stroboscopic lighting technology. In this volume the behavior of the 12 species native to North America (a later volume covers the Caribbean species) are captured in amazing detail feeding on indigenous flora in natural-looking settings. There are aerial battles with birds grabbing bills with talons. When you look at the images and try to consider how they might have been accomplished it gets you to thinking. The Tyrrells never published their techniques, but I hoped that they built a self-contained, portabe rig like I did.
They published a single small photo of the Caribbean setup around a nest in a tree. They used a medium format camera with a lens of relatively short focal length (100mm or so), two or three large flashes a couple of feet from the bird, and perhaps a backlight in some photos. They used lightstands and tripods You can see two or three very large catch lights in the bird's eyes in most photos. In a presentation at the Field Museum in Chicago in the 1980s, it was stated that the flash durations were 25 microseconds, and this was certainly consistent with the technology available. Harold Edgerton, who ultimately made flash equipment available to the Tyrrells, had published some hummingbird results in National Geographic and other publications that alluded to flash durations of this order. But his images were more technical in nature; Robert Tyrrell was a commercial photographer who was able to create amazing natural looking images of birds feeding on indigenous flora.
I came across some of Robert’s early work in the stacks of the California State University at Hayward library. In the 1979 issue of Professional Photographer, Robert announced some initial results in a two page paper containing a single photo and a diagram of his setup. He had a five light setup, with 20-joule strobes, positioned a half a meter or so from the bird. He even used a large mirror to reflect more light back into the scene. At the time he claimed the flashes had a duration of 1/4500 sec, or 250 microseconds, and this was deemed adequate to freeze wing motion. With the unbridled enthusiasm we all have had when achieving a particular milestone or creative moment in photography, Robert proudly displayed a dark and grainy photo in which he apparently disguised a feeder with flower, with a hummingbird frozen in flight. Looking back it seems primitive, but this was film, 1979, and no one had ever done anything like that with commercially available equipment.
The American Southwest is home to twelve or so hummingbird species. Some important areas in Arizona are:
- Santa Rita Mountains: Madera Canyon and Patagonia
- Huachuca Mountains: Ramsey, Miller, and Ash Canyons
- Chiricahua Mountains: Portal area, Cave Creek
These locations are “sky islands,” with mountains rising several thousand feet above the desert floor, and with a surprising the amount of flora and fauna that results from a fairly small elevation change. There are two small “monsoons” in Arizona, occurring usually in April and August, and roughly coinciding with the spring and fall hummingbird migrations. Historically, the wildflower blooms associated with these periods served to sustain the birds on their migration routes. But in modern times, it seems that mankind has done well to support the birds with feeders at parks, preserves, homes, eco-lodges, inns, and B&Bs.
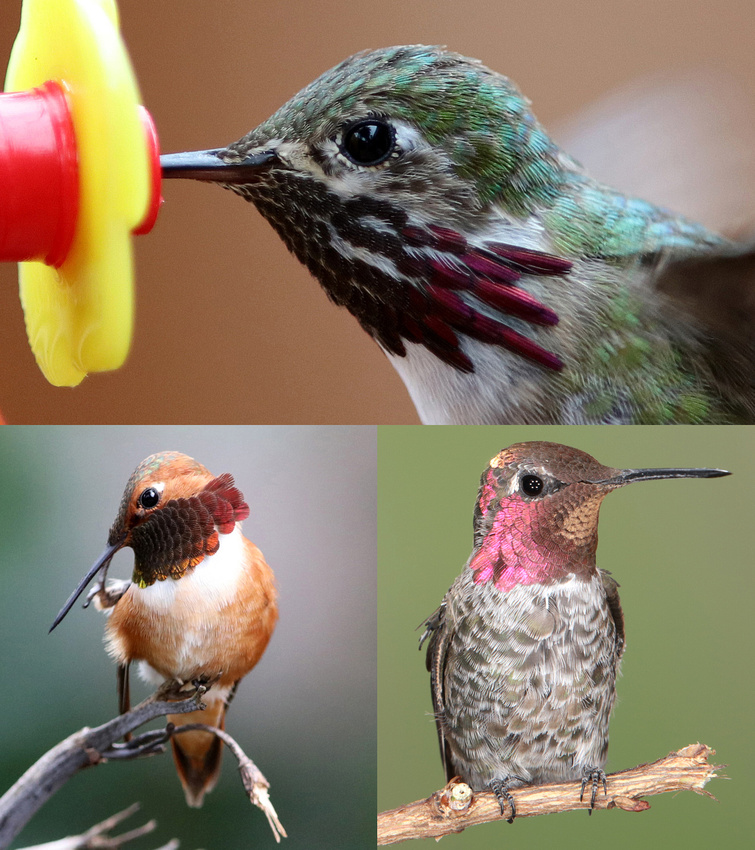
In the Northern California Bay Area, we have one resident species, Annas, and another one, Allens, that spends the spring and summer. In southern California, there is a hotspot at the Kern River Preserve, near Kernville. Here the resident species include black chinned and annas.
Photo: Bay Area Hummingbirds: Allens (m) natural light, a hybrid Calliope? (m) natural light, and Annas (m) multiple flash
Natural Light: Before you can consider freezing wing motion, there needs to be enough depth of field to even see the entire wing. Depth of field is subjective to a large extent, but a good starting point is 20mm for a 400mm lens @ f/2.8, 4 meters from the subject. And things scale from there. Depth of field will increase linearly with f#, decrease as the focal length squared, and increase with the square of the subject distance. Given that roughly five inches depth of field will cover the entire bird, for a 400mm lens, at 4 meters this requires f/16. Changing lenses will not help the situation because the depth of field gained from a shorter focal length lens will be effectively cancelled by the closer distance required for the same magnification.
For full sun, sunny f/16, this yields a shutter of 1/8000sec at ISO 8000. ISO 8000 is perfectly useable for modern digital cameras, although full direct sun is not ideal illumination. 1/8000sec is the fastest shutter available for a digital SLR. This will do a reasonable job of freezing motion at the path limits but not mid path where the wing motion is fastest. You often see photos with wings at the path limits, this is where the wing motion is slowest, and easiest to “freeze,” and where depth of field is not as critical.
Note about mirrorless camera e-shutters: Modern mirrorless cameras have can have much faster electronic shutters, but the so-called rolling shutter effect can lead to distorted images. The top of the line mirrorless cameras do a pretty good job, though. Batted and kicked balls and other fast horizontally moving objects tend to look elongated but the effect is subtle. Also, be aware that some e-shutters synchronize with flash at slower speeds, and that this can add to the ambient light that contributes to the image. The holy grail, and this would really be a game changer in digital photography, would be the global shutter in which all pixels can be accessed independently.
Freezing Flight - Flash Epiphany: Natural light will not do the trick because not matter how much light there is, or what ISO is used, there is not a fast enough shutter currently available. But a flash of shorter duration can provide the necessary exposure, as long as ambient light does not contribute significantly to the exposure (otherwise, there will be ghost images). This could be accomplished by short duration flashes in shady or overcast conditions, at low ISO, and at the fastest shutter speed (usually 1/250sec) at which the flash will synchronize. Basically, two exposures are occurring at the same camera settings. One from ambient at 1/250sec that contributes very little to the image (because it is shady and the aperture is f/16), and one from a very short duration flash that occurs within the same exposure interval and provides essentially all the illumination.
By operating certain flashes at small fraction of their maximum energy, down to 1/64th or 1/128th energy, flash durations approaching 50 to 75 microseconds can be achieved. This duration will essentially freeze all animal motion. One problem with 1/64th energy, though, is that multiple flashes and close distances will be needed to achieve correct exposure. Typically my work included seven to nine flashes: four to six main lights at 0.5m, two background lights, and a back light. All flashes need to be at the same energy for obvious reasons.
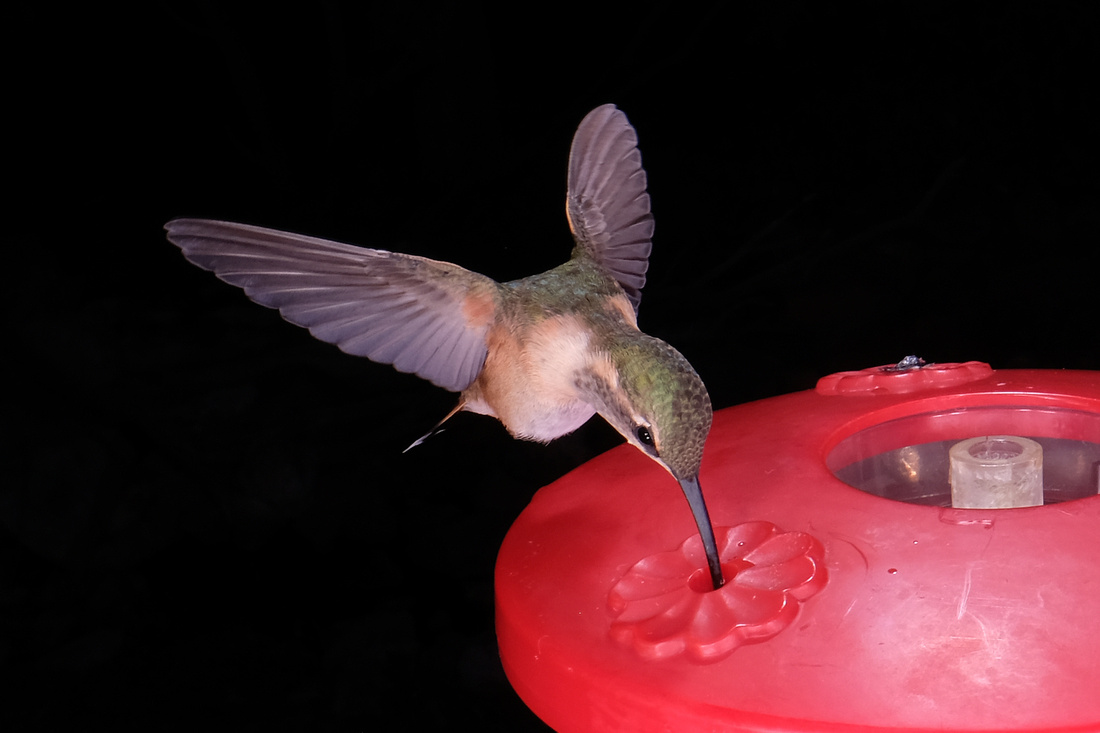
First Result: After this flash epiphany, my initial attempt to freeze a hummingbird’s wings was very simple. A 50 mm lens shooting through the window at a feeder. I needed a very close distance because there was only a single flash attached to the camera hot shoe. I shot with both the flash and camera in manual. Low iso, high f#, and 1/64th energy dialed in for the flash. I got a harsh, shadowy image, with stopped wings in mid-path pe where they were likely moving the fastest! The background was black, with ugly wing shadows on the body of the bird, but I loved it and I was on my way!
Photo: First result – shoe mounted flash at 1/64th energy
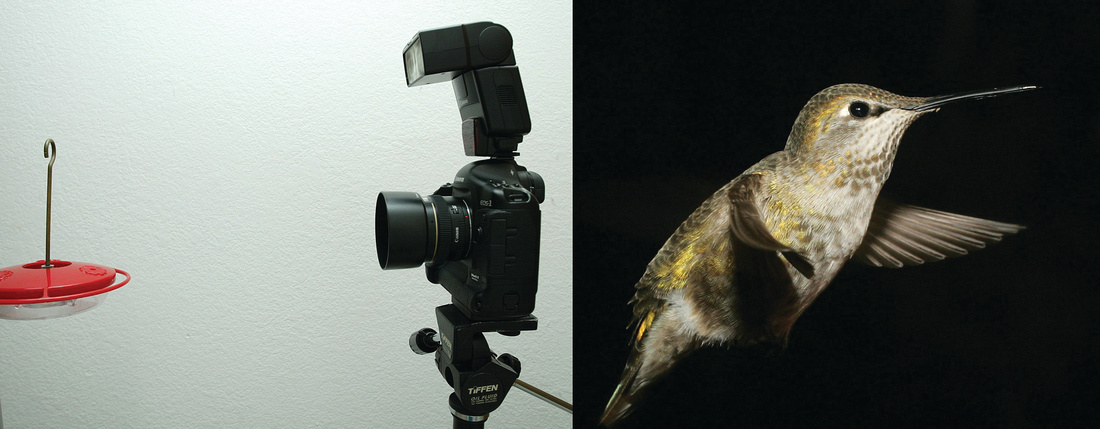
In manual mode most commercial hot shoe flashes like the Canon EX and NIkon AB start fully charged. They fire and then cut out when the selected fraction of full energy has been used for the flash, resulting in a short duration pulse of light. Fortunately, after discharging a small amount of energy, the flash will not take long to fully recharge. Rapid fire is possible and practical.
But, be aware, not all flashes operate in this manner. Some studio flashes will only charge up to the prescribed fraction of full energy and then when fired discharge this amount over a much longer period. You are safe using the Canon EX and Nikon AB type flashes, and also the Einstein Flashes in action mode. Note that the different models of these flashes, for example Canon 430EX, 550EX, 600EX, etc., differ in the maximum amount of energy they output, but conveniently, they will generate, for the same energy fraction, the same flash pulse duration. This also applies to the ring and macro flashes from these manufacturers. Use of these on-camera flashes for freezing motion will be covered in a subsequently.
Often, but inaccurately, flash power and energy are referred to interchangeably. Flash energy is specified in watt-seconds, or joules. One watt-sec equals one joule. Flash power is the rate of delivering energy, for example, in watts. A Canon 600EX flash delivers approximately 80 joules in 0.002 seconds: this is 40 kilowatts of power. A Prius, or other small car, generates about 100 kilowatts.
Probably the best value in terms of short flash duration and energy is the Einstein flash. At 5 watt-secs (or 1/128th full energy, the lowest setting) this unit delivers a short duration flash equal to that of a Canon 600EX flash set at 1/32nd energy, but with 3 times the energy output. However, the Canon hot shoe flashes are more versatile. They have zoomable flash heads and output a beam that has a rectangular cross section that matches the image frame.
Canon, Buff (Einstein), and Microflash Pro units were evaluated. I made these measurements with a sensor manufactured by Electro Optics Technology, a ET-3000 InGaAS (900-1600nm). While this sensor is not designed to operate in the visible wavelengths, flashes emit energy in the infrared that was used for the measurement. Recently, flash duration measurement capability has been incorporated into exposure meters such as the Sekonic L858D-U. The numbers in the table below are consistent with others reported online, and also, in a relative sense they are consistent with my table saw measurements (see below).
At one point I was optimistic about a Microflashpro unit that I had an opportunity to evaluate. I hoped it would be the best solution, at one hundred times the energy of the Canon flashes and with an advertised flash duration of 36 microseconds. But alas, measurements show that the duration is really no better than an Einstein flash which cost 5 times less. The Microflashpro lamp is a cylindrical configuration about 300 mm long. One plus is that at 150 joules, you can equip it with a DIY softbox and still have plenty of light. It is f/32 at 2 meters, ISO100! It will overpower the sun, so in theory you could walk around your garden in any lighting situation with a 150 joule, 130 mircosecond flash! Essentially all the light for the image would come from the flash. But in practice the Microflashpro is heavy and hard to work with. Energy is not adjustable. It weighs over 10 kilograms and it is about the size of three bread loaves placed side to side to side. Although it has 3/8-16 and ¼-20 tapped mounting holes, it does not take to a tripod well. The company makes another version, much lower energy, similar form factor, with an advertised duration in the microsecond range, if you can believe that. (Update note: it appears that Microflash Pro is no longer available and that John Nicol's Company is out of business. Units may be available on EBay)
Measured Flash Durations for some Commercial Flashes
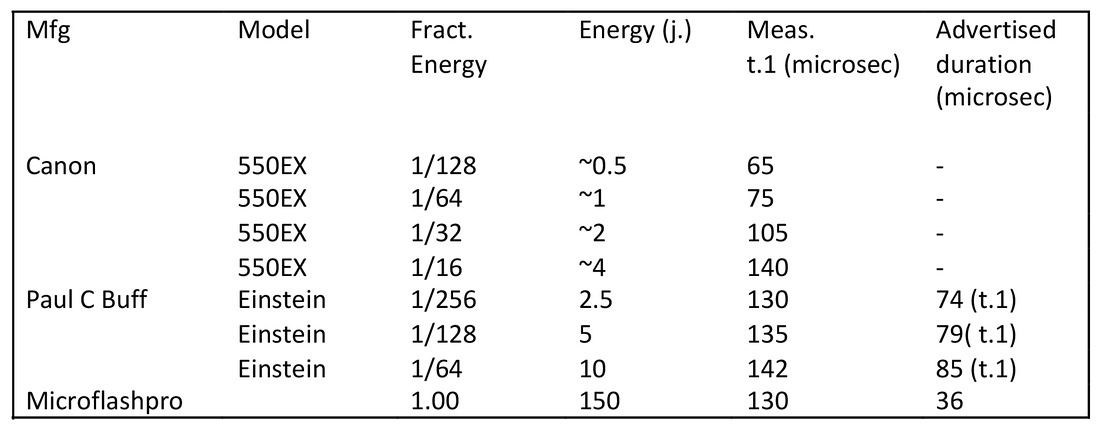
Figure: Flash Curves for Canon 550EX and 430EX flashes at 1/8th, 1/16th, 1/32nd, and 1/64th energy. Plotted is relative power vs. time in microseconds.
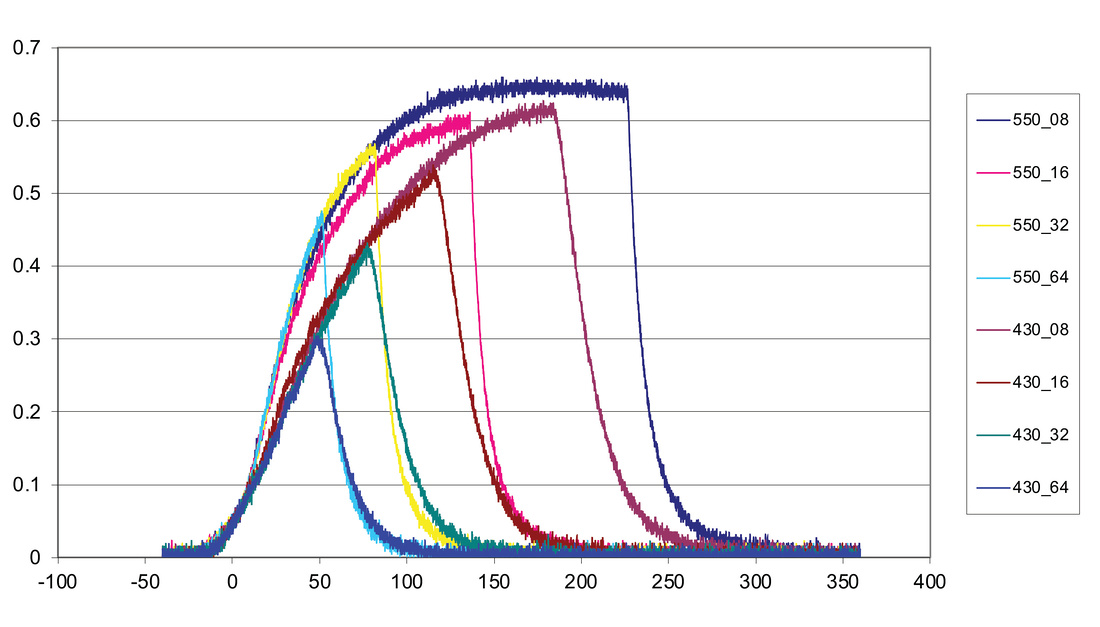
But you do not have to use a fast detector, or even rely on what the manufacturers might tell you. You can measure it in a relative sense. I compare flash duration between models, brands, and identical units of the same model as follows. Mark some radial lines on a table saw blade that rotates at high rpm, such as 3600 rpm. Take some photos of the spinning blade at different flash energies. Your flashes are not likely to freeze this motion, but just compare your blurry results in a relative sense, energy to energy, flash to flash, brand to brand.
The short duration flashes are so low energy that there is no way to overpower the sun, even at very close distances, so this hummingbird photography must occur at dawn, dusk, in shade, or a very overcast day. Since the flash synchronizes with the camera shutter, which is typically 1/250sec, ambient light must not provide any significant light otherwise there will be motion blur from the ambient light long exposure. A good gauge: turn off the flash(es), shoot - the frame should be dark.
Practically, to ensure a dark ambient field, to stop wing motion and provide a depth of field of around five inches, in shady conditions, a typical setup is six Canon 550EX flashes at 18 inches from the bird, operated at 1/64th energy, ISO 200, f/16. Getting the correct exposure is tricky. With the exception of the gorget, hummingbirds are very drab. But flowers are very bright. Most hot shoe flashes have articulating heads that can be re-pointed to feather away from flora and more toward where the bird is expected to be.
As for illuminating the bird, it may not tolerate a flash, bracket, or lens in close proximity. Even if it did there are good reasons not to get too close with the flash. Why not closer with the flashes, even if the birds will tolerate it? The flash light will diminish with the square of the distance. The closer the flash is to the birds the greater the relative falloff for a given distance change. Effectively there is a light depth of field which can lead to over or under exposures for small distance changes.
What about buying all those flashes? Well, you can purchase used Canon and Nikon flashes from Adorama or B&H Photo for a small fraction of the cost new. Batteries will last the entire trip on one charge because little energy is used.
It is crucial that all your flashes fire at exactly the same time and be of the same energy. For this reason, a multiple flash setup should not mix brands or models within brands. There is a variety of methods to trigger simultaneous firing of the flashes, and some to avoid. Commander modules, do not use them. They typically sit atop the camera hot shoe. These units often use light to communicate and trigger the individual slave flashes. Both the commanders and the flashes have limited fields of view, and also, light is easily blocked. Designating one flash as the master to control other as slaves – be careful here as well. The master may use light and a pre-flash to communicate with the other flashes – this can cause delays. A good radio trigger, like Pocket Wizard, or the Buff radio trigger, is reliable and will penetrate walls, brackets, and humans with good range.
Zoom. Many hot shoe flash heads will zoom to the focal length of the lens attached to the camera, or they can be manually zoomed. This is a good feature and can be used to concentrate the light. In fact, the flash guide number is typically reported at the maximum zoom, for obvious reasons.
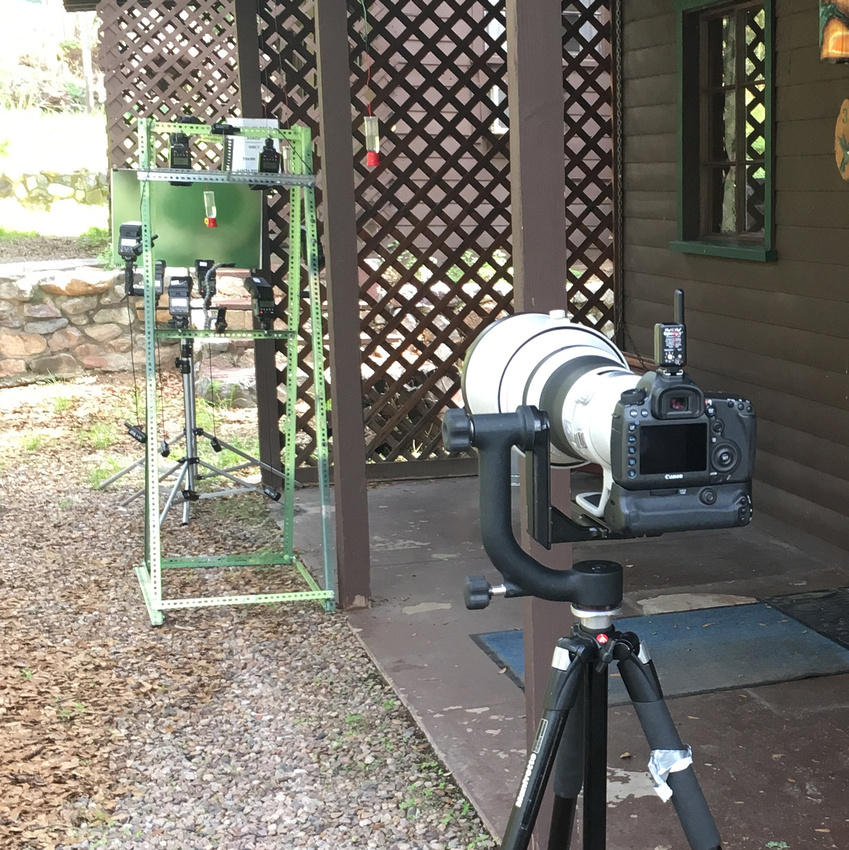
My basic setup consisted of six to nine Canon 550EX flashes. Four to six of these units comprised the main light, one or two were used to illuminate the background, and one was used as a back or “hair” light. Lighting stands can be very cumbersome and you want to reduce the amount of hardware near the bird if at all possible. I built a single frame to hold all the lights in their positions. In this way the frame was a self-contained lighting unit, very handy for photography in the field. This frame was essentially a sled that could be moved around to wherever it is needed. It was comprised of bolted angle iron which could be easily disassembled and reassembled in the field. And since it is self-contained, all the flashes can be pre-aligned, then the entire unit can be slid into place. Whether I use a 400mm lens at twenty feet distant or a 16 mm lens much closer, I always shot from a tripod through the “ring” of the main lights.
Figure - "Lab" setup of flash rig
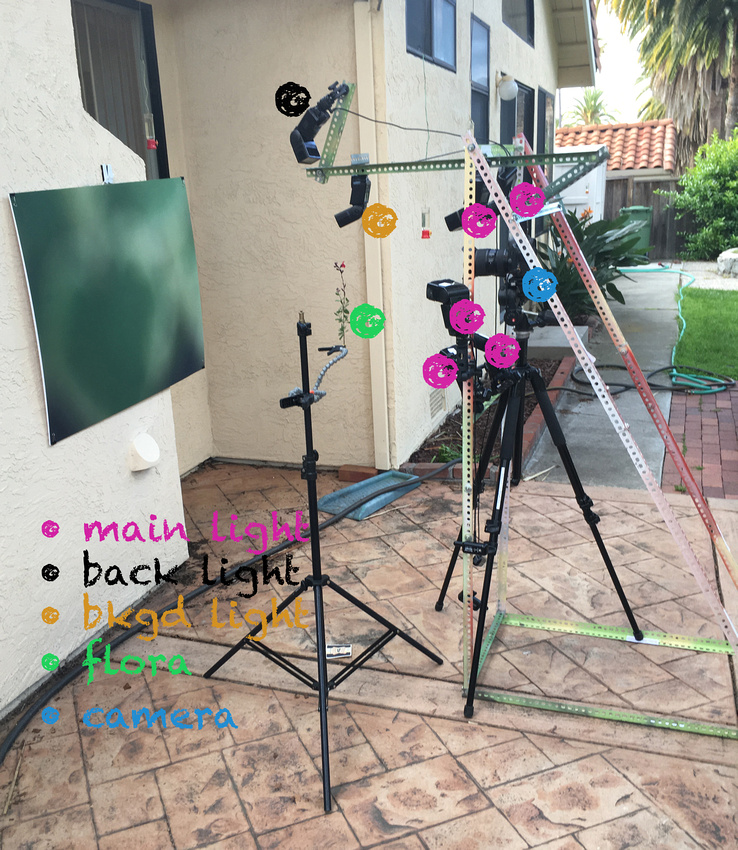
Figure – Flash rig in the field, Madera Cyn, AZ
llumination Strategy - Main Light
Main Light. A multiple flash setup for hummingbirds begs for a uniform illumination pattern over a fairly large area. My flashes are typically ~18 inches from the bird. With all the flashes working together, I try strive to uniformly illuminate an area 12 inches wide by 8 inches high, at the focal plane. This is area is approximately the field of view of a 400mm lens at 15 feet.
I mapped out the illumination patterns of individual flashes at various zooms (the hot shoe flashes typically zoom from 24mm to 105mm), and found that they accurately zoom with the stated focal length. And furthermore, the illumination across the rectangular frame projected by the flash’s optics is remarkably uniform.
By zooming to 50 mm I find that I can cover a 12 in x 8 in area uniformly for a flash 0.5m distant. I zoom all flashes to 50mm and try to aim all flashes at the center of the 12x8 field. The light from all the flashes is additive. With the multiple flashes aimed at the same point, they illuminate the subject as a single, large, uniform source. Remember, all flashes are the same model, all set to manual, all set to the same energy. You control light levels by either zooming or aiming each flash, or changing distance, but not by changing energy.
Now, keep in mind that shading is also key to a good portrait. Flashes on one side can be zoomed or redirected relative to the other side in order to create “main” and “fill” lights for portraiture. This assumes, of course that you have some control / knowledge over the position of the bird.
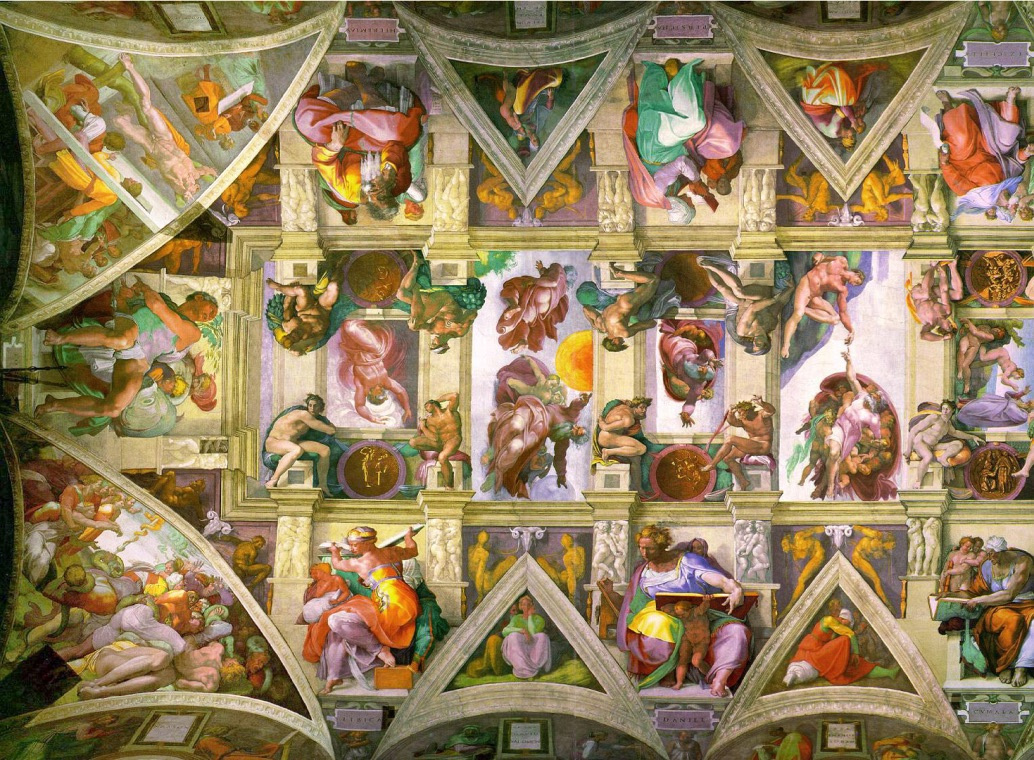
Figure - Shading is key to a good portrait. The ceiling of the Sistine Chapel is actually smooth – he painted it in relief! For hummingbirds this effect can be created with the aid of a back light - see below.
Illumination Strategy - Background
Background light. The background will in general be dark unless it is illuminated separately. The main lights will provide some background illumination but birds and flowers in the field of view will create shadows in the background. Backgrounds can be natural, or poster boards, or will end up being black if the background is far enough away. If you go out in the garden and take a blurry photo, and then print this perhaps 20in x 30in, this can serve as background to illuminate with dedicated flashes. A natural looking poster board background is not as easy to achieve as you might imagine. You blur the image when you shoot the background photo and it is again blurred in your hummingbird photo. So, include more detail in the original photo than would seem necessary. I struggled to find the best lab and the best paper on which to print. I found that a matte finish works best, but I tried a couple of labs and many mattes until I got it right. The biggest problem was finding a paper that would not shine when illuminated by the flash. The background should complement the bird and the flowers, perhaps contain similar coloring. Remember that the background flashes must also be synchronized with the main lights.
Figure – The background should complement the subject:
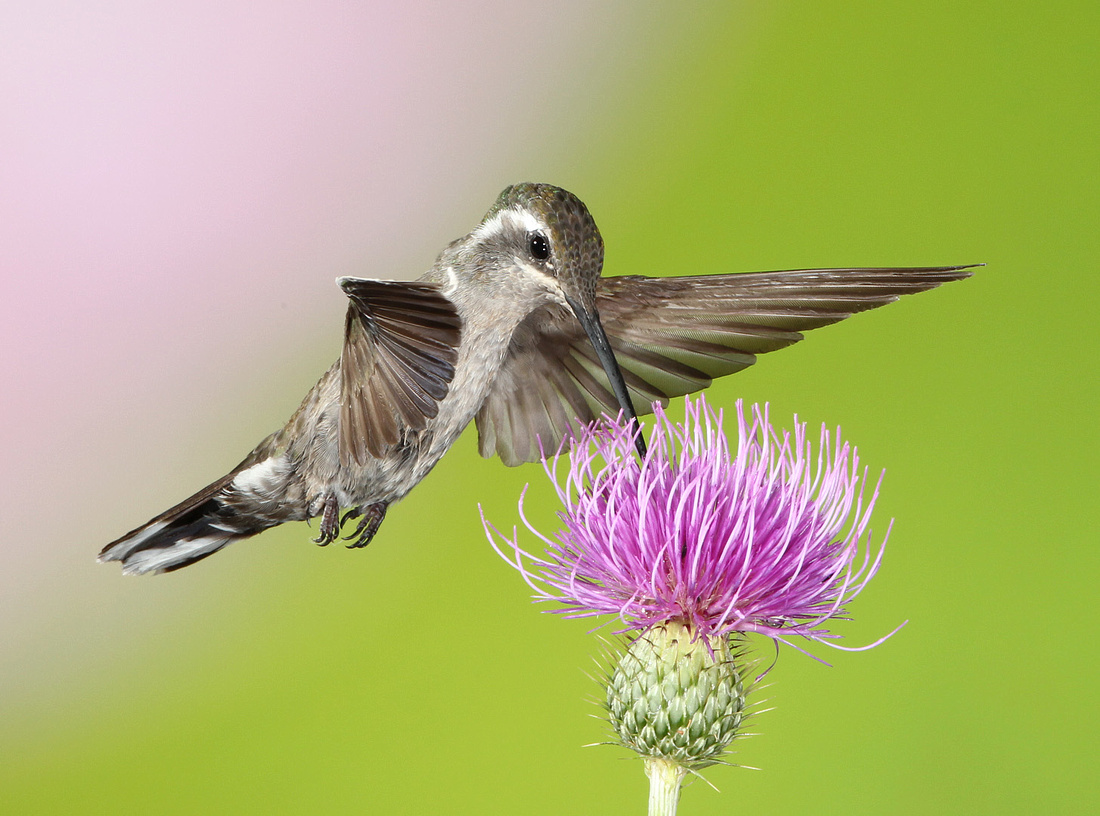
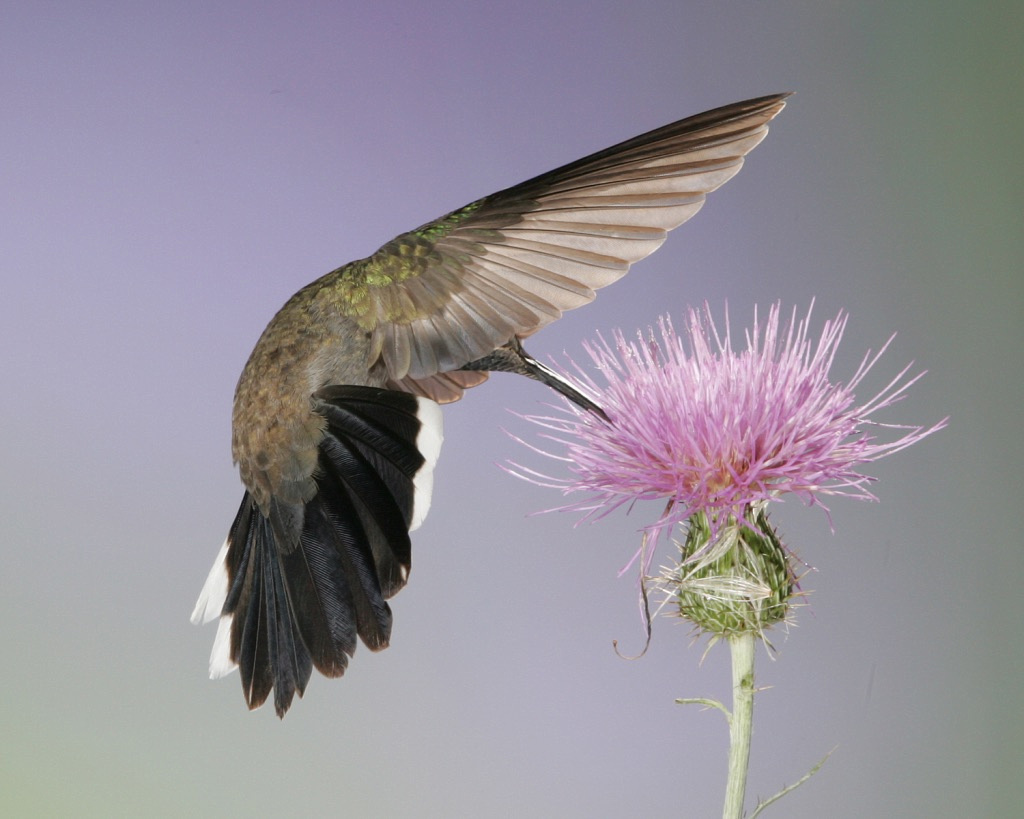
Figure – Background lighting, the High Key. Broadbilled Hummingbird, autumn sage (salvia greggii), Madera Cyn, AZ

Illumination Strategy - Back Light
Back (or “hair”) Light. A top, or backlight, consisting of one or more flashes located out of the field of view, can make the bird image pop and stand out from the background. This is why a portrait photographer uses a light from behind to illuminate the subject’s head and shoulders. It does not take much. Try shooting a photo with just the back light flash turned on. You know you got it right when the flash generates an outline of the otherwise black bird. You can see this in the photo below.
Figure – Lights off - except for the back light, this is how to verify the back light is correct:
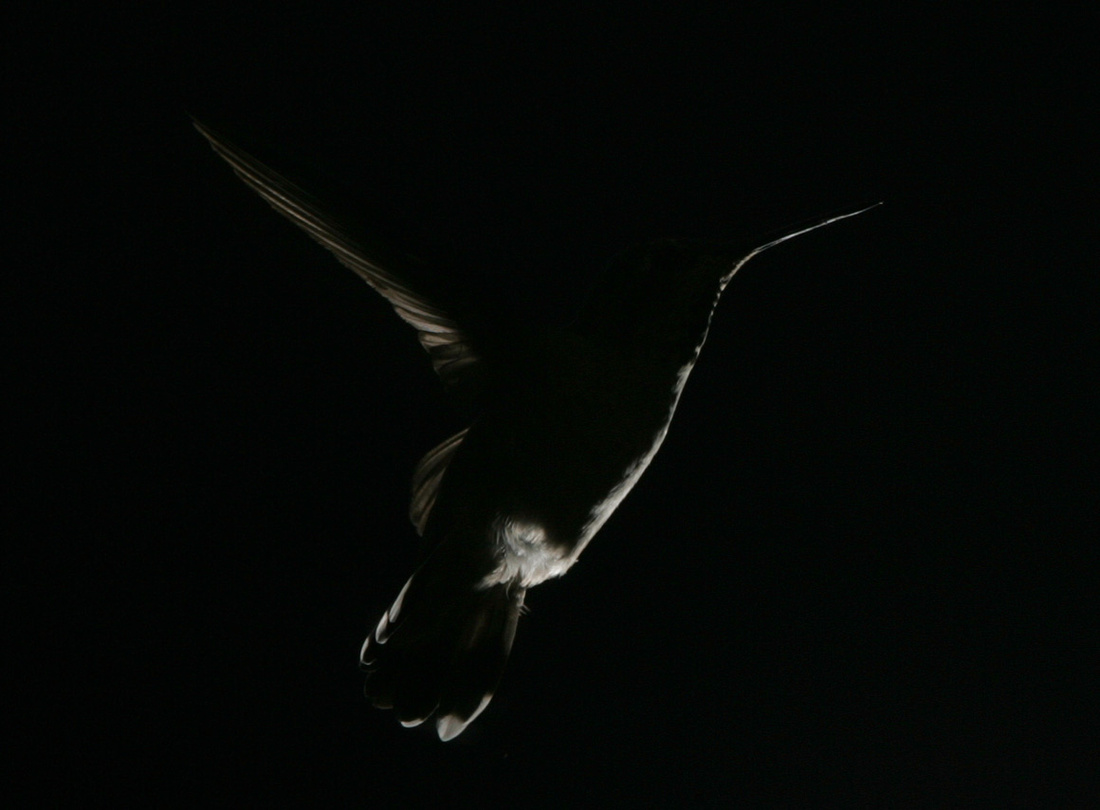
Figure - Main light only. Blue Throated Hummingbird at Smooth Bouvardia, bouvardia ternifolia, Portal AZ
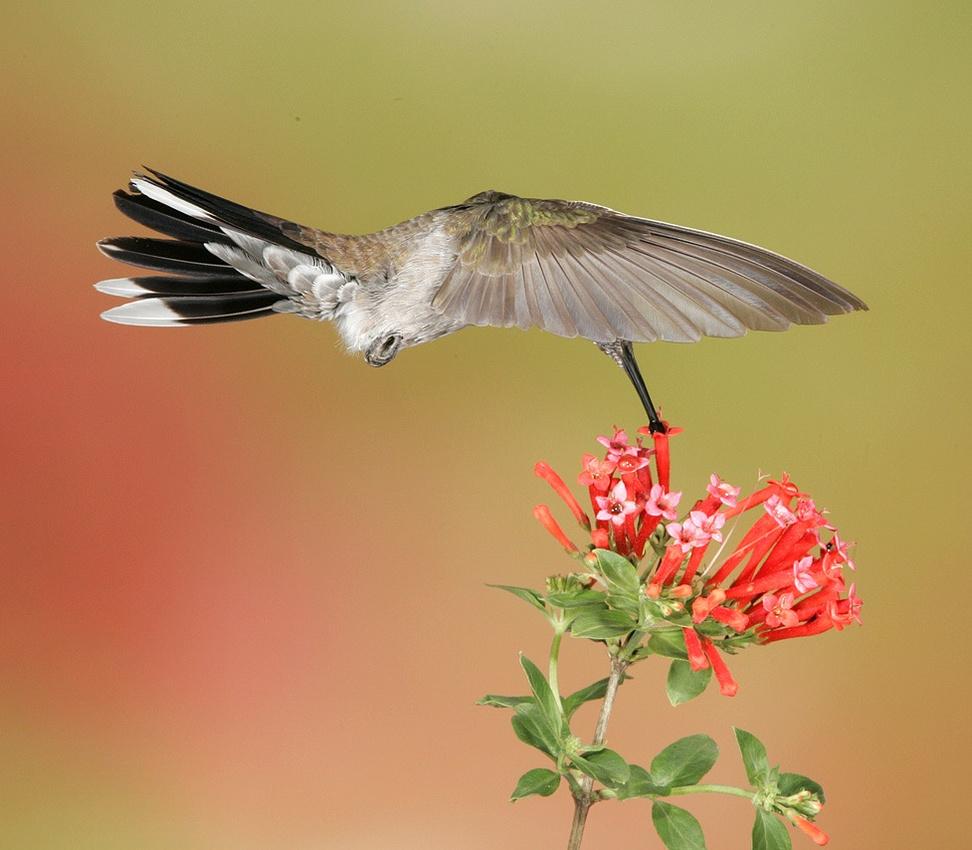
Figure - Main plus back light. Blue Throated Hummingbird at Bull Thistle, Cirsium Vulgare, Portal AZ
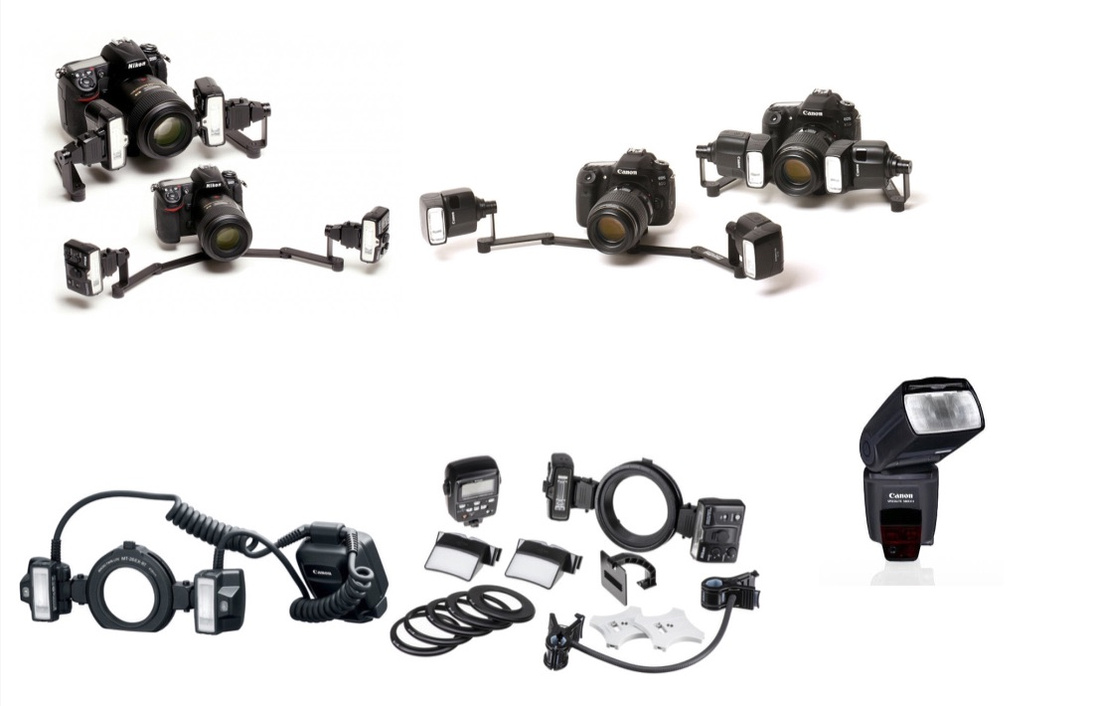
Alternatives to the Basic Frame Setup
The Einstein flashes are capable of short duration flashes that equal the Canon or Nikon flashes at 1/32nd energy. Not quite short enough duration but they have perhaps six times the energy of the Canon flashes at 1/32nd energy. So, for the main lighting you can get by with two of them and at a larger distance, to boot. A favorite setup of mine is two Einsteins (with 11-inch long throw reflectors), 45 degrees off frame center and 36 inches or so from the bird. The nice thing about such a setup is that because the long throw reflector makes them a large source, the main lights can light a background directly without any shadows,
The Canon macro flashes, MT-14 (ring flash) and MT-24 (dual articulating flashes), can be attached to the front of a macro lens. This allows the flashes, operating at low energy / short duration, and the camera to be close to the bird. While the macro lens would not be far enough away to provide a reasonable depth of field and field of view, these flashes can be attached to some short focal length lenses. And this is a convenient method of having flash and camera all in one package that can be tripod-mounted near the bird. The stopping ‘power’ of the MT-14 and MT-24 flashes will be the same as the other Canon hot shoe flashes, although at a much lower energy. At the same fractional energy they will have 16 times and 5 times less energy, respectively, than the Canon 550EX flash. So, you have to get close, so close that the bird may not tolerate the proximity of your equipment.
Another option is a dental bracket. Before the intraoral cameras were available, dentists typically used macro lenses with multiple flashes like the MT-14 or MT-24, attached to a macro lens. You can purchase a dental bracket that attaches to your camera. From this bracket you can mount a couple of big Canon 600EX flashes. Now you have a high energy, stop action, single piece assembly. Two of these big flashes, 12 inches from the bird, ISO 200, f/16 will work just fine. A rather cumbersome and unstable configuration, and tricky to mount on a tripod, but be careful and it can work for you. If the bird will not tolerate your presence this close, you can shoot tethered with a fixed focus point.
Figure – portable setups for short duration flash photography
It is commonly thought that a short focal length lens will change the perspective of the subject, and it will, but what actually determines the perspective is the distance from the subject. Try a portrait at 400 and 40 mm, same distance in both cases. The perspective will be the same. Why are the traditional portrait lenses in the 100mm range – because you can fill the frame with a head shot at a distance that provides a pleasing perspective and does not intimidate the subject. And what is this distance? Stand in a mirror starting up close and back up until your face looks normal. Shoot at twice that distance (your image in the mirror is actually behind the mirror the same distance you are in front of it) with a focal length that gives you the desired field of view.
Most people are used to seeing bird photos in telephoto, where the camera is quite a distance away (recall that 20 feet or so is needed to achieve a six-inch depth of field with a 400 mm lens at f/16). But if you are much closer to the bird with a shorter focal length lens, your view will change to more of an up close and personal perspective. With the shorter focallength you will maintain the same depth of field as long as the field of view at the subject is the same. If you are far enough away, it will be hyperfocal, where everything from one half the distance to the subject to infinity is in focus. For long focal lengths the depth of field will be split roughly 50/50 in front and in back of the subject, but as the focal length decreases there will be less depth of field in front of the subject and more behind.
It will help if you become familiar with simple depth of field calculations. An easy way to calculate depth of field is by the rule of 10. f/10 at a focal length of 10 centimeters (or 100mm), ten feet from the subject yields a depth of field of 10 inches. The depth of field at other distances, f#s, or focal lengths can be scaled from the rule of 10. Depth of field is linear with f#, so for example f/5 with have roughly half the depth of field of f/10. Now, depth of field scales as the square and inverse square of distance and focal length respectively. Doubling the focal length will decrease the depth of field by a factor of four. Doubling the distance will increase it by a factor of four.
Another good rule: for a full frame sensor SLR, with a 35mm lens, the width of your field of view at the subject equals the distance you are from the subject. For other focal lengths, or cropped sensors, scale accordingly. Example: for a 70mm lens the width of your field of view will be one-half the distance you are from the subject.
Figure – Natural light, 16mm, f/1.8, 1/640sec, Annas Hummingbird bird (m)
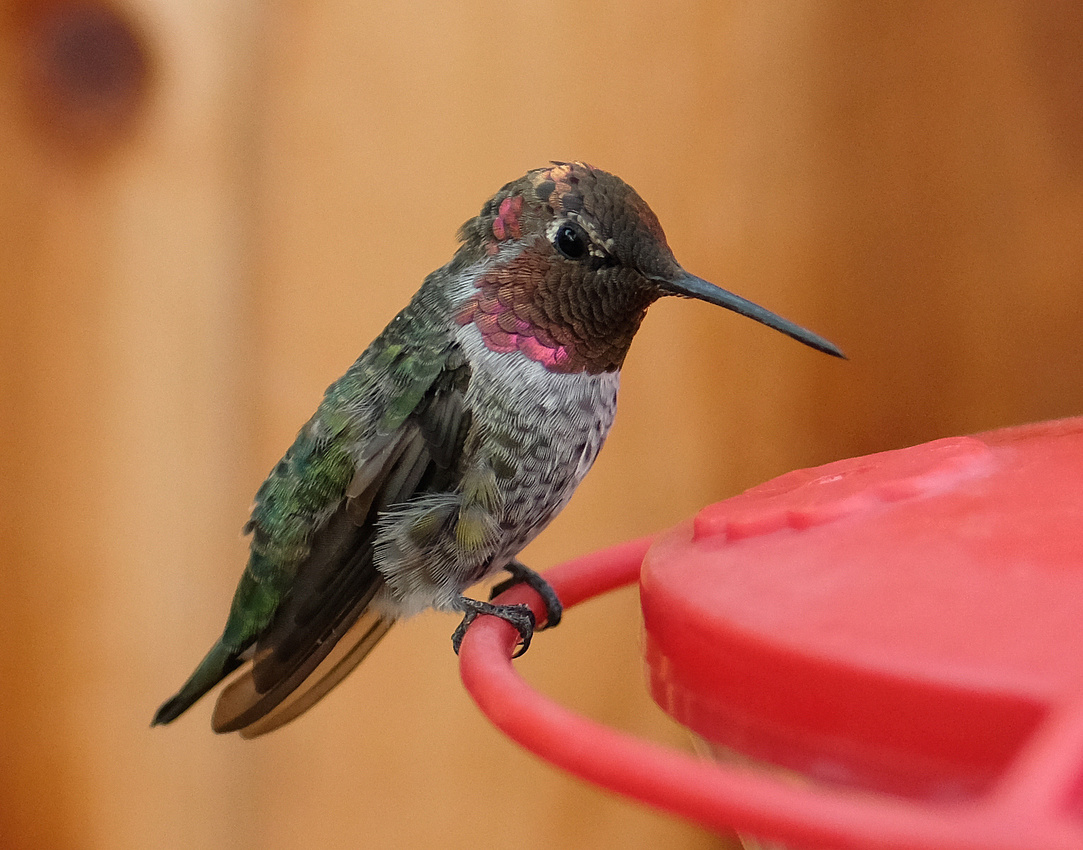
Figure - Flashes 32mm f/16. Annas Hummingbird (f), echeveria
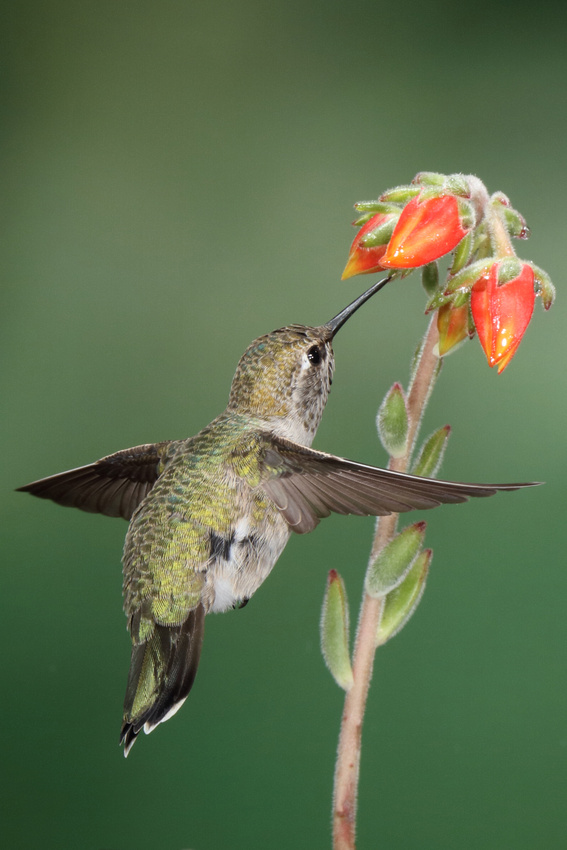
Figure - Flashes, 16mm f/16, Lucifer Hummingbird (f), Ash Cyn, AZ
Sometimes, incredibly, you have to move back to see more.
For the multiple flash work, I prefer to shoot at high f-numbers to display the entire set of wings in focus and within the depth of field. For most lenses, image quality begins to degrade with increasing f# starting at f/5.6. For the long telephoto lenses, it gets particularly bad starting at about f/16. Note that the only image quality I am considering here is that which can be assessed by a resolution target in the center of the frame. This degradation is dependent of the type and quality of lens to some extent, but optical physics determines it. This degradation occurs because light passes through the lens aperture, an aperture that essentially becomes ever smaller, approaching a pinhole, at higher f#s. Light is diffracted, it curves as it passes by an edge or through a small opening. This leads to an overall fuzziness of the images.
Now here is a very interesting result I discovered (note that this highly dependent on your particular camera and optics). For the Canon 400mm f/2.8 L II on a Canon 5DS, these two configurations have the same image quality:
1. Object distance 20 feet, f/14
2. Object distance 17 feet, f/18
Because of diffraction the f/18 row has similar image quality even though the image is larger (more pixels) because the object is closer.
Keeping in mind that the flash-to-bird distance is the same for both rows, row 1 can use less flash energy because at f/14, (14/18)^2 or about 60 % more light is collected and therefore 60% less flash energy is needed to result in the same image quality. An alternative would be not to change the flash energy and use 60% lower ISO.
Auto focus vs fixed focus. Most people are used to seeing bird photos in telephoto, where the camera is quite a distance away (recall that 20 feet or so is needed to achieve a five-inch depth of field with a 400 mm lens at f/16). This suits an autofocusing photographer well in that the bird will tolerate your presence at this standoff distance. Auto focus of these fast birds can be difficult even with modern camera bodies, particularly if the lens is not fast. The Canon R3 mirrorless body actually has an autofocus setting for animal eyes, and it works incredibly well, and when the bird is too far away to recognize eyes, it converts to a rectangular focus area that surrounds the bird and tracks focus.
Recall that we are shooting at dawn/dusk/shade. Less light makes it harder to achieve focus. The camera will use the lens native f# (i.e. the lowest) to achieve focus. So that is the argument for using a long and FAST lens for better autofocus.
More often than not you can predict where the bird will ultimately be – at the flower, or at the feeder, right? So, sometimes you can fix your focus at a point. This way you can use any focal length lens and shoot remotely.
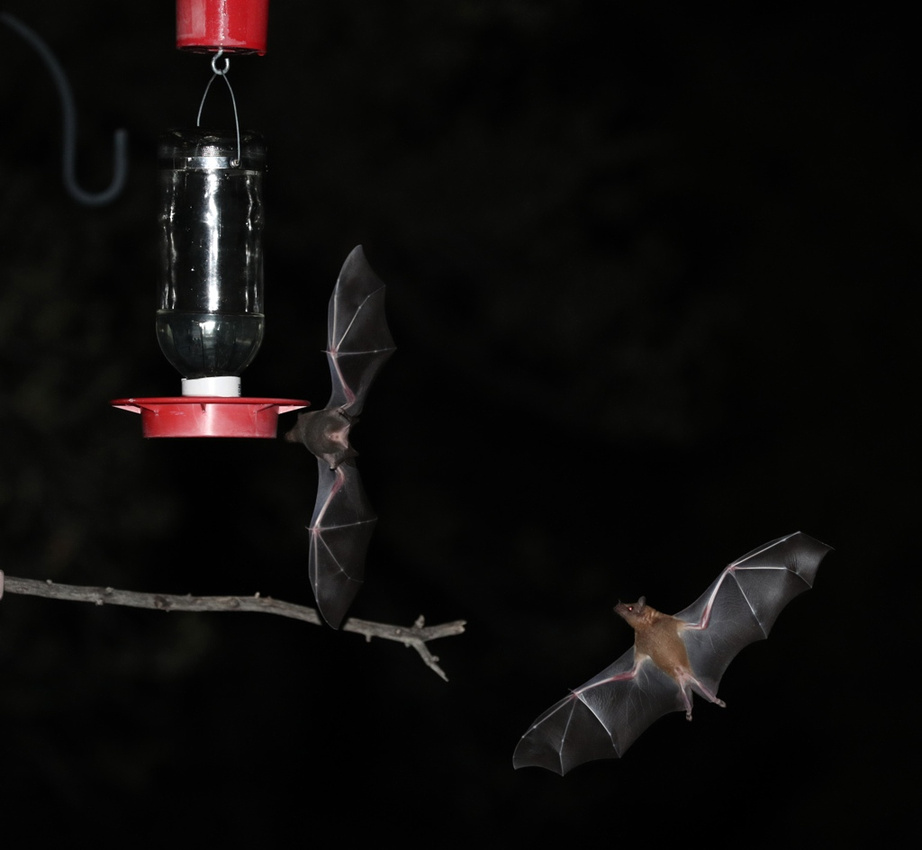
Madera Cyn AZ. Santa Rita Mtns. Alongside Madera Creek the Santa Rita Lodge has a large public viewing/feeding area. They also have casitas and cabins for rent. If you stay there you get plenty of bird seed so that you can spike the area around your cabin. Unique hummingbird species include the Plain-capped Starthroat and large Magnificent (Rivoli). I stay at one of the cabins and setup my rig on the front or back porch. There is lots of shady hiking trails along the creek up to 5000 ft elevation with access to the Baldy Saddle at 8700 ft. elev. The Mexican brown bats come out at night to feed on the hummingbird feeders. And you can walk around for photos of them. Attach a flash to your hot shoe. Put the camera in manual mode. Flash in ETTL. Push up the ISO and you can get a short duration flash. No need to worry about the ambient flight! Auto focus is impossible in the dark, but light up a feeder with a flashlight and set focus there.
Mexican brown bats, Madera Cyn, AZ:
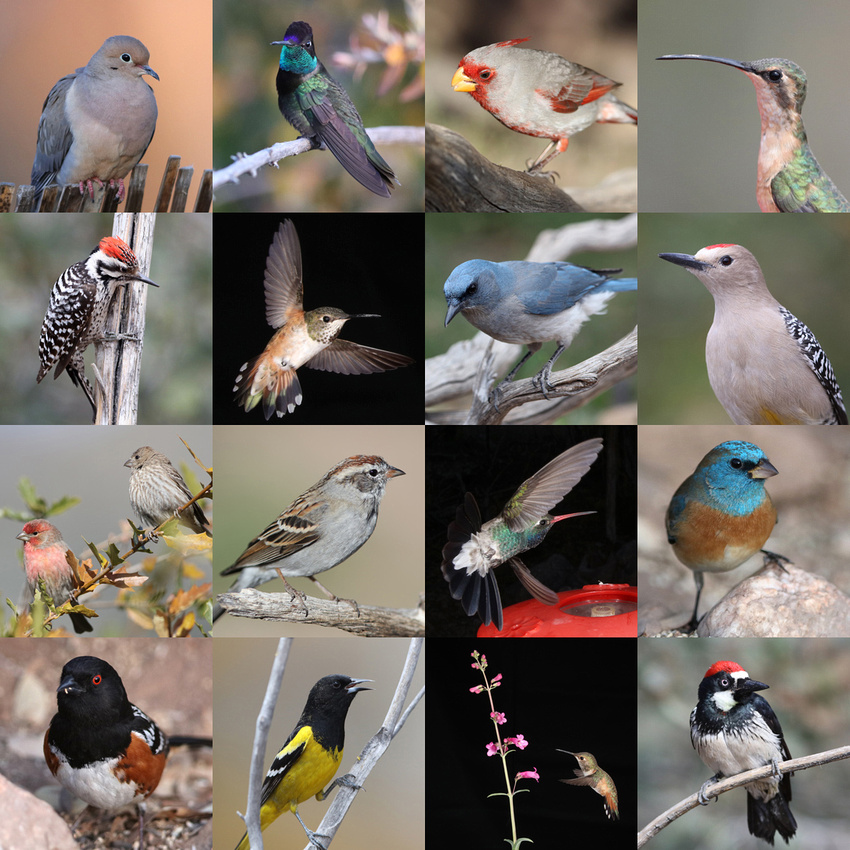
Ash Cyn Sanctuary, Sierra Vista AZ., Huachuca Mtns. Stay in Sierra vista which just 10 miles away. Recently upgraded preserve. Species of note: Lucifer Hummingbird. You can rent a blind that accommodates two people and is ideally located for morning illumination. They put out food in strategic locations, not feeding stations, for a more natural look. If you rent the blind, you pretty much have the area in front of it to yourself. I spent one morning there shooting mostly passerine, and here is a sample of what I got:
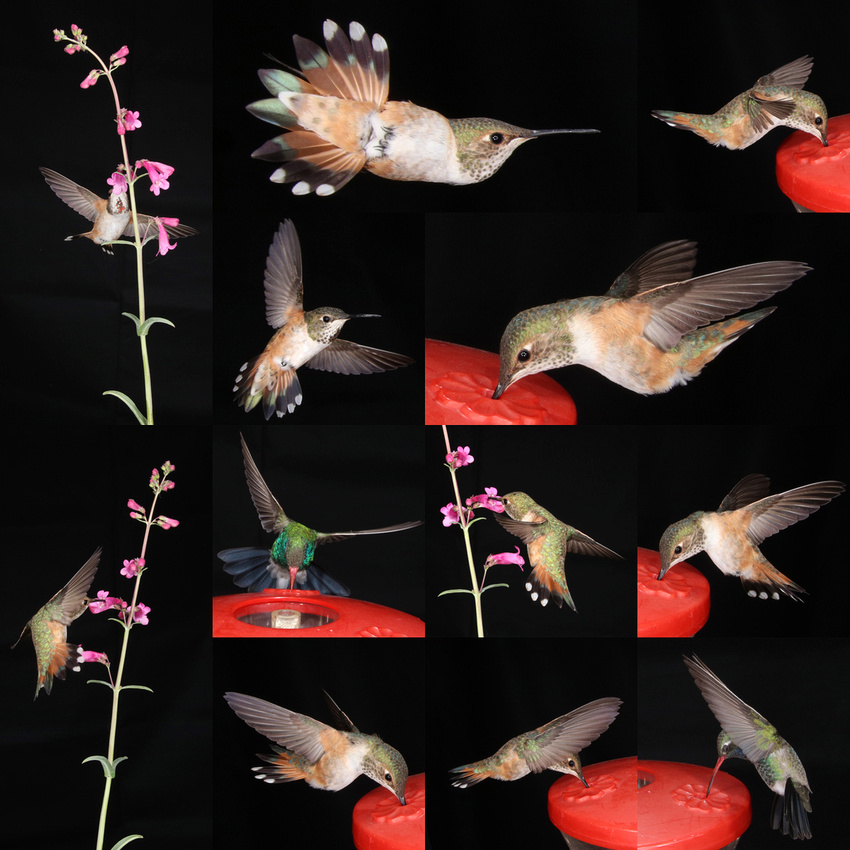
And from the dusk hummingbird shoot at Ash Canyon - black background for fun:
Portal AZ, Cave Creek Ranch. Chiricahua Mtns. A former “Dude” ranch. Wild and more remote. 50 miles to nearest Safeway. Stock up before you arrive. Be careful, lots of rattlesnakes. Species of note: Elegant Trogan, Blue-Throated Hummingbird (7-inch). Large public viewing area, very nice nature-related library in the lodge. Large cabins creekside:

Ramsey Cyn, Hereford AZ. Huachuca Mtns. Trail head at Nature center with small viewing area.
Miller Cyn, Hereford AZ. Huachuca Mtns. Large Public viewing area. Cabins for rent on the ground of an apple orchard / apiary.
Kern River Preserve, Kernville,CA. Kernville is a popular white water rafting area. It can be crowded. You have to stay Kernville. Convenient, stores nearby. Large public viewing area.
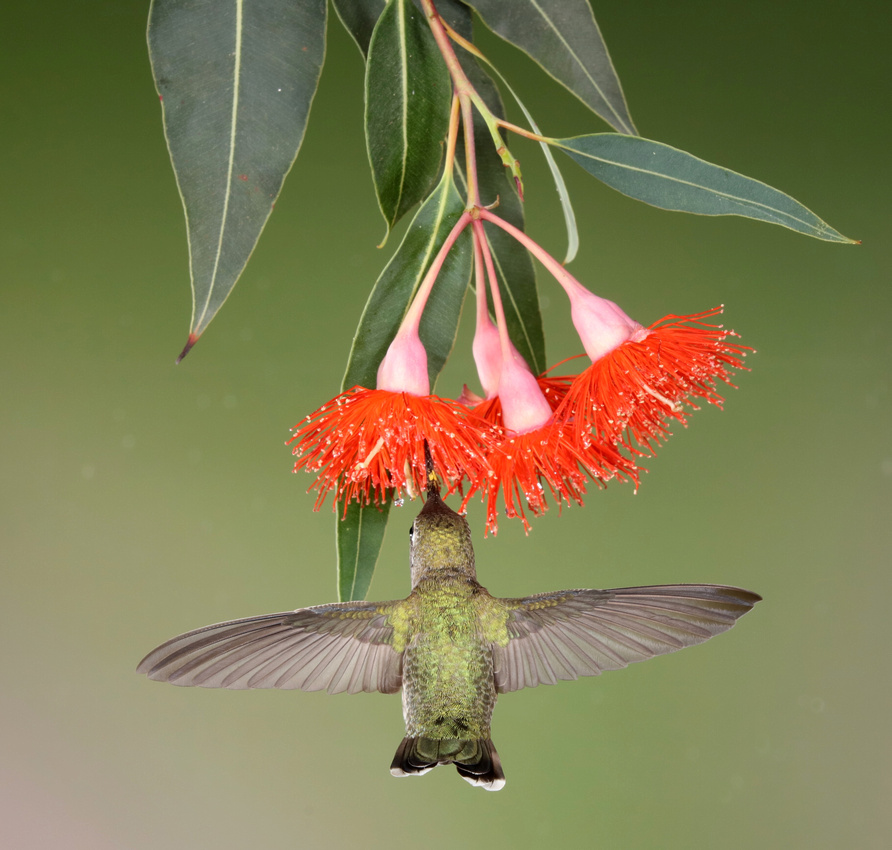
This gallery features Annas Hummingbird feeding on a variety of flower plants found in gardens, yards, parks, and road sides in the Bay Area.
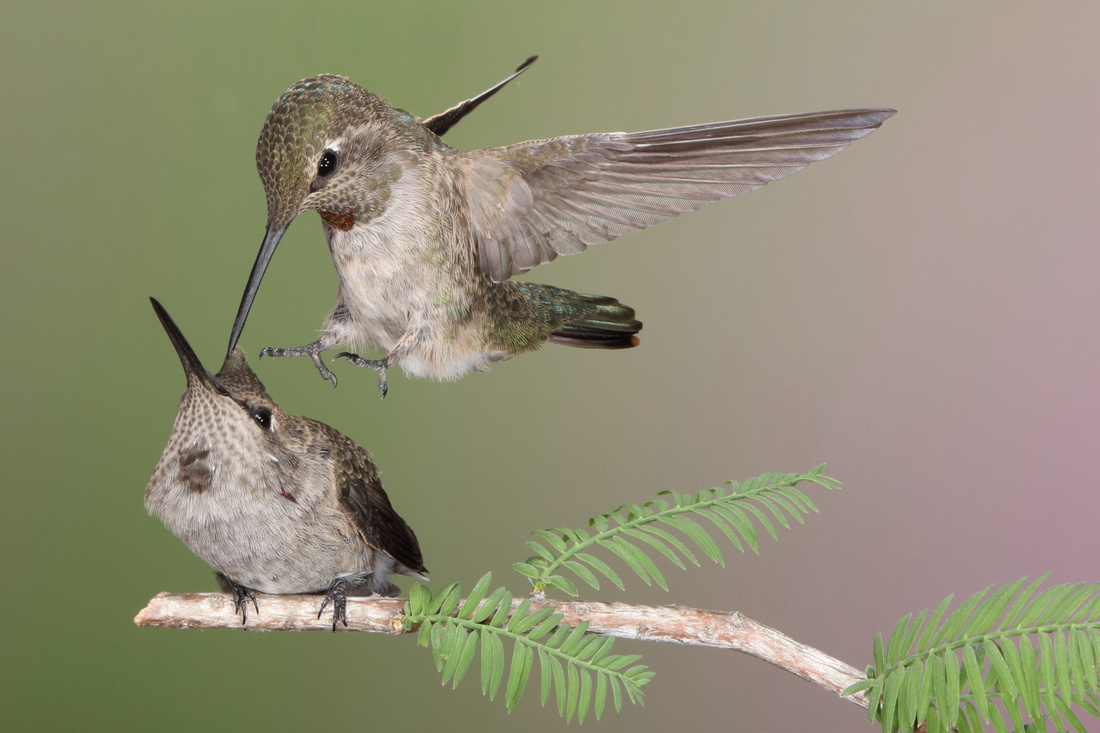
Turf Battles - about the closest thing to social behavior in Hummingbirds!